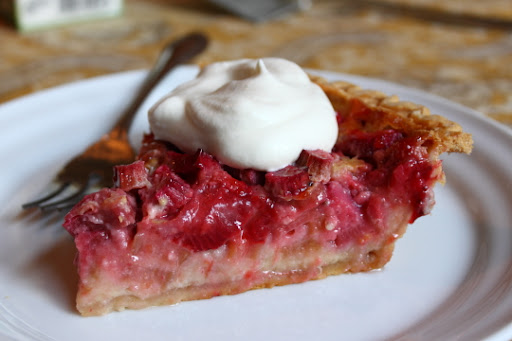
Because I grew up listening to baseball on the radio, whenever I heard the word “rhubarb,” I wouldn’t think of something edible and delicious like this amazing Strawberry Rhubarb Pie, I’d think of fights.
Back in the early days of radio, when they wanted to get the sound effect of an angry mob, they’d tell the performers to repeat the word “rhubarb,” over and over. It sounds heated and contentious, yet the listener doesn’t hear any specific words.
Baseball announcers of the same era began to call baseball fights “rhubarbs,” since they sounded so much like those radio effects. I didn’t learn about this until recently, and it made me think of all the games I’d listened to during all those summers, and how never once when I heard “rhubarb,” did I think of pie.
That was until I got this wonderful recipe from my mother Pauline, who I believe got it from my Aunt Angela. As you longtime readers know, both are fantastic bakers and while I love all their pies, this might be my favorite.
So, when Matt Cain drills Matt Kemp in the back this summer, and he charges the mound prompting an ugly benches-clearing brawl, and the play-by-play guy says, “we’ve got ourselves a real rhubarb now,” I will think of this pie. This delicious, rough and tumble pie. Enjoy!
3 cups sliced rhubarb
1 cup quartered strawberries
3 large eggs
pinch of fresh nutmeg
3 tbsp milk
3 tbsp all-purpose flour
1 1/2 cups sugar
*I didn’t mention, but I added a very tiny pinch of salt 1 tbsp butter for "dotting" pie dough for one 9-inch crust For the glaze: 2 tbsp jam with 1/4 tsp water, warmed in microwave
I’m calling this chicken and “dumplings” for search engine purposes, but these came out so well that internally we going with chicken and “dumplins.” That’s right, if your dumplings really rock, you’re allowed to drop the “g.” It’s the highest honor one can bestow on this humble dish.
The wonderful thing about this dumpling recipe, besides its ease, is how truly versatile it is. I’m not even referring to the actual dumpling batter, which of course can be tweaked with various herb and/or dairy substitutions, but to the delivery system beneath these puffy pillows of pleasure.
These dumplings can be steamed over virtually any flavorful soup or stew-like substance. The rule of thumb is; if you can simmer it, you can cook a dumpling on it. However, as I mention in the video, the thinner the liquid, the easier and better the dumplings will steam.
If you do prefer a thicker stew, simply fortify your mixture with a standard roux before you add the picked chicken back in. We’ve made like a hundred rouxs, so I’ll assume you can cook 1/4 cup of butter together with a 1/4 cup of flour for a couple minutes without major incident.
If this is your first batch of dumplings ever, then I'd recommend going with the soupy base you see here. Once you get the dumplin(g)s down, you can start to experiment with thicker, more interesting stews.
So, whether you go thick or thin, crème friache or buttermilk, thyme or rosemary, or any another other approved variation (FYI: all variations are pre-approved), I hope you give this classic American comfort food a try. Enjoy!
Ingredients for 4 large servings:
For the stewed chicken:
1 whole chicken (about 3.5-4 pounds)
1 onion, cubed
1 large celery rib, cubed
1 large carrot, cubed
1 bay leaf
3-4 springs of thyme
2 1/2 quarts cold water
salt, cayenne, and freshly ground black pepper to taste
*thicken mixture slightly with 2-3 tbsp chicken fat mixed with 2-3 tbsp flour
For dumplings:
1/2 cup crème fraiche
1/2 cup milk
2 eggs
2 tsp fresh chopped thyme leaves
2 cups self-rising flour
* If you don’t have SR flour (which does work better here) you can use 2 cups all-purpose flour sifted with 3 teaspoons baking powder and1 teaspoon fine table salt.
On this Memorial Day, as we honor those who gave their lives serving our country, let’s take an extra moment to remember all the countless military cooks and chefs that made the ultimate sacrifice feeding our troops in times of war. They say an army travels on its stomach, but more than simply providing calories, these brave souls are serving up a visceral connection to home.
We have a lot of servicemen and women that visit the blog from around the globe, and the emails I get from them are some of the most inspiring of all. Words can’t express how much we appreciate all your hard work keeping us safe. Thank you, God bless you, and God bless America!
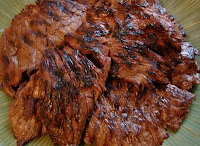
I hope you're all headed toward a fun and festive Memorial Day weekend! Here are 12 of my favorite grilled recipes, just in case burgers and hot dogs aren't going to cut it this year. And don't forget the side dishes! Everyone knows they're the real secret behind any epic cookout. That, and beer. Enjoy!!
Usually when I post a recipe, I want it to be fantastic, awesome, incredible, inspiring, and/or mind-blowing. With this turkey shish kaburger, I was only shooting for not horrible. Happily, we achieved that and much more.
I’ve received countless food wishes for turkey burgers over the years, but just the mere thought of that dull, pale, insipid lump of meat (aka “the Mitt Romney of meat”), had me reaching for the delete button. Even when I’m out for a cheeseburger, and I see someone in front of me begrudgingly order the turkey burger (hold the mayo), I think to myself, “that poor bastard.”
So, how do you turn the dreaded t-burg into something that would cause envy instead of pity? When in doubt, go ethnic! I figured if we borrowed from the famously flavorful shish kabob, but used turkey instead of lamb or beef, we just may be able to pull this off. I know I lot of you think chunks of meat when you hear “shish kabob,” but ground meat is also used, and I’ve always preferred that version anyway.
As I mention in the clip, I used the “rising juice method” to test for doneness, but since ground poultry isn’t something you want to take a chance with, I suggest you use a thermometer to ensure an internal temperature of 165 degrees F. Just keep in mind, since turkey is so low in fat, no matter how incredibly well you season the meat, if you overcook these, even a little, they will be dry.
But, the good news is if you don’t, and remove them with most of their precious moisture intact, you’ll be enjoying a turkey burger that’s not only not horrible, but is actually delicious. Enjoy!
Ingredients for 4 turkey burgers:
1 1/2 lb ground turkey
1 1/2 tablespoons plain breadcrumbs
1 1/2 tablespoons ground almonds
1 or 2 tsp hot chili paste, or minced fresh hot peppers
2 cloves crushed garlic
1 1/2 teaspoon finely grated fresh ginger
1 1/2 teaspoons salt
1 1/2 teaspoons garam masala
1 tablespoon lemon juice
2 tablespoons yogurt
2 tablespoons chopped fresh cilantro *I garnished mine with mayo, topped with red onions and tomatoes I tossed in lemon juice, and more cilantro leaves.
I fear I am turning into a moany old cow. On and on I go, whinge whinge whinge, with no good reason. Either life is so boring, yawn, isn't motherhood a drudge, I've got no work on, I'm a total failure - or !!! everything is chaos !!! Kitty is ill!!!! and I haven't a MINUTE to myself and GOD MAN ALIVE if only someone would HELP ME.
I'm worried that it's all getting a bit samey, that I'm starting to repeat myself, going on, getting boring. And I also think I might be starting to repeat myself.
That reminds me of my mother's favourite story about the Queen Mother, which goes like this:
The Queen Mother is visiting an old people's home and she says to an old dear: "Do you know who I am?" The old dear smiles and points a trembling finger yonder: "Oh, if you don't know who you are, you go and speak to that lady over there."
Then my mother cries with laughter.
I am jolly lucky that my mother is alive, in good nick and living just up the road. She is catnip for toddlers, my mother. She lets them make a terrible mess and break things, pick food off her plate and put marbles in their mouths. When children reach a certain age, (about two and a half), she takes them out collecting sticks and then they bring them back to the house and set fire to them.
So as you can imagine, the last ten weeks living at my mother's house has been like paradise for Kitty. She calls my mother Gagu (pronounced Gah-gee), which is a mutation of the Welsh for granny, "Mamgu".
"GAH-GEE?!" shrieked Kitty every morning. "GAH-GEE! GAH-GEE! GAH-GEE!" We are back home now and Kitty wanders the echoey rooms saying "Gah-gee?" sadly.
Living in my childhood home has made me start to really fetishise childhood in a way I never thought I would. There are millions of children at my mother's house, all the time. Never fewer than two, under five. So there is Play-Dough smelted against almost every surface, boxes of Lego, Charlie and Lola videos and an audience of stuffed toys wryly watching the action in every room.
Now Kitty is walking and talking I've turned into one of those mothers who wants to preserve their child's "innocence" and bang on to myself about wanting her to be able to be "free" to "be a child".
I'm being an idiot, though. I remember clearly the grim games of "grown-ups" that used to go on in the playground, my own yearning from about nine years old, to be several tens of years older than I actually was. Being small feels so unimportant. You are liable to be laughed at by grown-ups, they just won't take you seriously - it's dementing. You long to be older so that people will treat you with some fucking respect.
But I still plan to forge ahead with manufacturing a neat little cosily conventional childhood for Kitty, (even though it's actually for me), with Peppa Pig box sets, tea at 5pm, strict bedtimes, bucket and spade holidays, picture books, rocking horses, baking fairy cakes, wellies with frog eyes on the front. All that crap.
And I could do worse in my quest to shape Kitty's memories to my liking, than getting to be a dab hand at Welsh cakes, verily the taste of my childhood. They are also known as, I think, drop scones or griddle cakes. It's basically a sort of scone batter cooked in a dry frying pan. They are as delicious as they sound.
You cannot buy these, they do no exist commercially - and what I mean by this is that you CAN buy things that claim to the Welsh cakes on the packet, but the whole point about them is that they have to be eaten about half and hour off the griddle, still warm, with salted butter. Once they are not freshly made, piping hot, they cease to be Welsh cakes. At least that's my view.
They're alright the next day but not as good. My mother makes a batch when there is about to be an extra large kiddie invasion and we all stand at the kitchen counter at 3.15pm shoving them in our faces with both hands, before swinging on the curtains, daubing ourselves with mud and fighting each other with sticks.
Please note the self-raising flour.
Mamgu's Welsh cakes Makes about 20
8 oz self raising flour 4 oz butter 2 oz caster sugar 2 oz currants 1 egg
1 Put the flour, butter and sugar into a bowl and then cut in the butter (this is easier if the butter is soft. Yes I know this is a pain in the bum, but butter only takes 30 mins to soften up in a room temperature kitchen, so go away and fold some laundry or something).
2 Rub the butter in with your fingers until it looks like breadcrumbs.
3 Beat the egg, add in and mix until there is a pliable dough.
4 Roll out to a thickness of 1cm and then cut with a pastry cutter
5 Fry in batches in a hot, dry frying pan for about 4 minutes each side, or until golden brown, and then transfer to a cooling rack. My mother claims to have seen these baked on a hot hoe over an open fire in a field, but I think she might be having me on. You can never quite tell with her.
I was enjoying some barbecued beef brisket recently, and as I went to stick my fork into the potato salad that accompanied it, I could see something looked very different. The salad was chock full of what appeared to be some kind of chopped, dark, leafy greens.
I took a bite, and quickly realized it was mustard greens. What a great idea! The greens not only added an interesting heat, but provided texture as well. I made up my mind right then and there that I’d borrow this idea, and share it before Memorial Day weekend.
On my way out I thanked the counter person for the great lunch, and said how much I loved the mustard greens in the salad. He smiled and said thanks, but that they were actually dandelion greens. I mumbled something like “that’s what I meant” as I realized I’d been fooled by the prepared mustard and hot spices that dressed the similarly flavored green.
Anyway, I decided to stick to my original plan and use the easier to find mustard greens, and I was very happy with the results. As you’ll see, I went extremely simple in the ingredient list, but obviously you can dress this up with lots of additions.
By the way, this is no beginner’s potato salad. Mustard greens are spicy, slightly bitter, and not at all subtle, but when you consider the sleepy array of potato salads at your typical Memorial Day cookout, this original and very tasty alternative would certainly be a welcomed treat. Enjoy!
On Saturday, I attended a photography workshop led by acclaimed New York Times' food photographer, Andrew Scrivani. I thoroughly enjoyed the class, and left enthused to show off my new skills. That was until I remembered my next post was a mussels recipe.
So what? Well, during the class intro, Andrew did a slide show to illustrate various keys concepts and strategies, and the bowl of mussels you see below was used to demonstrate how a simple, eye-catching prop, like a vintage fork, could help draw the viewer’s attention away from less-than-attractive shellfish.
Andrew Scrivani/NYT
A brilliant ploy, and one I would have implemented, except that my silverware drawer contains exactly zero fancy shellfish forks. So, I decided instead to use the inside of a mussel shell, as an attempt at some nacreous misdirection. Did it work? You be the judge.
Anyway, I’d like to extend a big thanks to Andrew and the other attendees for a very enjoyable afternoon. Also to Contigo, a wonderful Spanish joint here in San Francisco, for being such great hosts.
Here's a handful of my favorite pictures from the workshop. I hope you enjoy!
I love this shot of Andrew showing my friend, Annelies, how to use a screen to adjust for the bright light reflecting off bald people’s heads. This is a technique that will serve me very well going forward.
If I ever specialized in one specific food photography niche, it would be meatballs. Why? I really like meatballs.
Does your eye go to the world's most beautiful ice cube, or to that horribly discolored radish? Was this a bold attempt at textural juxtaposition, or did I simply forget to turn the radish over? I think we all know the answer to that question.
This probably best encapsulates all the key elements we discussed during the workshop; details, light direction, props, movement, and telling a story. My only regret is not having a little drip of water coming off the tip of the root. Maybe if I have time later, I'll Photoshop one on. I'm sure Mr. Scrivani would have no problem with that.
This photo provided my proudest moment of the workshop. It was one of the few shots I composed, as I thought it'd be interesting to use the lines of the garlic skin to play off the grain of the wood.
When the photo was shown later, my blogger buddy, Irvin, from Eat the Love, said he liked the shot because of how the garlic skin lines played off the grain of the wood. I just smiled appreciatively, but inside I was like, "Yes! Yes! In your face, other attendees that didn't get similar comments!" Hey, at least I was outwardly classy.
This almost sexy octopus skewer photo is alright, but what I really love, is how if you look closely enough, you can see the entire universe in that drop of oil. I find that very relaxing.
If you want to see more of Andrew's fine work, you can check out his blog, Making Sunday Sauce, or his photography website, Andrewscrivani.com, as well as follow him on Twitter. If you have a chance to attend one of his workshops (like the one we are doing together at this summer's IFBC in Portland), I highly recommend it!
This seriously delicious drunken mussels recipe is one of the quickest shellfish preparations known to man. Bring a flavorful, wine-based broth to a boil; add mussels and cover; cook until they open, and eat. That’s it!
Of course, before this big bowl of awesome can happen, you need to get everything prepped and ready to go. You long time foodwishers know this is called “mise en place,” which is just culinary lingo for organizing your ingredients.
Speaking of ingredients, most large seafood departments stock P.E.I. mussels, but if you can’t find them, this works beautifully with clams as well. Clearly, this is one of those primary recipes that can be twisted and tweaked in hundreds of ways by using different beverages, peppers, citrus, and herbs. I hope you give this a try soon. Enjoy!
I received an email the other day from someone wanting to know how they can make ice cream without the machine I demonstrated in our vanilla ice cream video. I replied that you really can’t, since it’s the churning of the mixture while it freezes that gives you the desired texture.
Then, the very next day, I saw this video from my friend Johnathan Lynch, showing how to make a berry ice cream with no ice cream machine. Technically it’s frozen yogurt, but still. You do need to find a food processor, but if you can, this trick does work very well, and as you can see, it's very fast and easy.
By the way, yes, that is Fabio Viviani making a cameo appearance! Thanks to Johnathan for sharing, and I invite you to check out his YouTube channel for more. Enjoy!
I did it. I made macarons. Finally, I can apply for my food blogger merit badge! Hold on, I’m being told I still need to make mini-cupcakes and a quinoa salad to qualify. Oh well, I’ve waited this long.
Anyway, this was my first attempt at macarons, and for not having any clue what I was doing, I was quite happy with the results. They looked fine, and the texture was almost identical to the ones sold at Chantal Guillon, a famous macaron bar here in San Francisco.
So, was it beginners luck? Yes. You would think since I waited three years to make these, I would have done more research, but I did almost none. In fact, I literally used the first chocolate macaron recipe I found, which happened to be from David Lebovitz. He’s an American, but he lives in Paris, so I figured I was okay.
I watched a few videos, read a few articles, had a couple drinks, looked at a few step-by-steps, and off I went. One thing I did notice was every single resource used a different recipe, as well as different times, temperatures, and techniques. So, I figured I would just use my instincts and try the most straightforward method possible.
I didn’t do any high-heat/low-heat tricks; no waiting for the tops to dry; no sugar syrups, etc. I just made the batter, piped it out, baked them off, and as you can see, they were not bad at all. One thing I did figure out all by myself was to use the ugly ones as the bottoms. By the way, there’s a very inappropriate metaphor there, if you’re looking.
So, here’s the deal; if you’ve never made these before, I hope this inspires you to give them a go. Believe me, if I can do these anyone can. However, if you’re an experienced macaron maker, we’d love to have you chime in. I can’t wait for this comment section to fill up with invaluable tips and tricks for what I should have done, and how I should have done it.
I know I piped them wrong. You’re not supposed to make a swirl, but keep the tip pressed in the center as you squeeze. I also heard that I should have cooked one pan at a time, because the bottom pan is more likely to crack. What else? Don’t worry about my feelings…after four years of posting videos on YouTube, I don’t have any left…so let me have it. And, as always, enjoy!
*Weighing the ingredients is critical. Do not make these unless you have a digital kitchen scale!
100 gram powdered sugar
50 grams almond meal aka almond flour (the finer the better)
25 grams unsweetened cocoa powder
2 large room temperature egg whites
65 grams granulated sugar
For chocolate ganache:
1/3 cup hot heavy cream
4 ounces dark chocolate, chopped
pinch of salt
*pour hot cream over chocolate, and stir until smooth. Allow to cool slightly before filling cooled cookies.
Bonus Coverage: For more chocolate macaron information, my friend Denise from ChezUs makes some amazing ones, and knows WAY more about these than I do, so you can bug her with your questions too! ;-)
There is nothing more boring than a blog post that starts "Sorry you haven't heard from me for a while, it's all just been so busy...."
It's as boring as settling down to read someone's diary and the entries go:
"2nd Feb... ... Dear Diary, gosh it's been so long since my last entry!...."
"5th July... ... Dear Diary, gosh it's been so long since my last entry!....."
So I won't start this blog post like that. And anyway, I'm not sorry. It's a miracle I update Recipe Rifle at all, what with my chronic heartburn and never making a penny out of it and being totally and utterly fed up with both cooking and writing.
If you are looking for some sort of explanation then it's because at first I couldn't think of anything to say. All I could think was how annoying Kitty was being, but that was what the last post was about. And then whenever I was about to sit down and do something, awful things would happen. Like Kitty got really ill. And I mean REALLY ill this time, a temperature of 104 and terrible eczema all over her and I had to see about a million different doctors and urgh, I feel quite ill myself thinking about it. AND my husband was away in America and the whole thing was so stressful I was sent running into the arms of a strip of Valium I nicked off my Dad. It was really Seventies.
And then we went on holiday for a bit, which was lovely but I wasn't going to blog from THERE. And now my husband's in trouble again for saying something or other on Twitter, which I won't go into because it's too dementing.
Anyway I am as I write this waiting for him to finish off some work before we go out for a Chinese to drown our sorrows in spring rolls and neon orange sauce, and I'm pacing about and worrying about him and feeling sad that it's all gone bonkers (again) and vaguely wondering if he can ever be persuaded not to say just exactly precisely whatever's in his brain .... and I realised with shock that Recipe Rifle is now an entire month out of date and as it so happens I've got something to say about lemon posset.
I don't like lemon puddings - at all. I've said it before. The acid of the lemon combined with the sweetness and sugariness of other ingredients reminds me powerfully of vomit. But there's something different about lemon posset, maybe it's the really serious creaminess of the thing.
We had this at my sister's house in Oxford over the weekend, made by a terrific fellow called Rory Dorman. Ah yes, the weekend, back when life was still nice and Twitter hadn't fallen on our heads. It seems a golden time, the one sunny day we've had for ages. Maybe the memory of it and the deliciousness of the posset will change my mind about lemon puddings for ever. But I suspect not.
Lemon Posset by Rory Dorman For about 6 or 8
500ml double cream lemon and zest of 2 lemons 100g sugar
1 Bubble the cream in a pan gently for 3 minutes
2 Add the sugar and your lemony stuff and whisk
3 Pour into ramekins or glasses and chill for 3 hours
We had ours with raspberry coulis and little posh french biscuits and it was delicious.
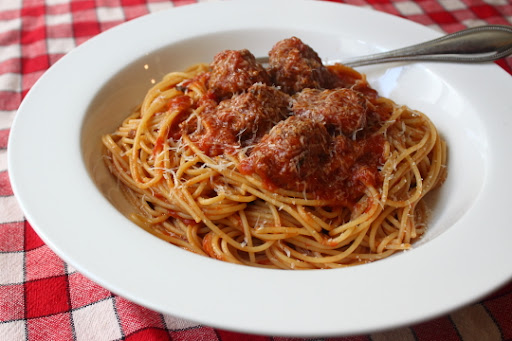
One of my favorite things about the Internet is how you can make outrageous claims with complete impunity. For example, I’m claiming that this is the world’s fastest meatball recipe, and while I have plenty of evidence to support my claim, I really like knowing that I’ll never need to. In related news, I’m one of the world’s strongest men.
Anyway, these meatballs are significantly faster than a traditional recipe for three main reasons: First, there’s no chopping and sauteing to make the base mixture. Secondly, there’s no rolling involved. Small meatballs cook fast, and are always tender, but they’re a pain in the butt to roll. By using a small portion scoop, you can do an entire pan in a few minutes.
Lastly, broiling instead of frying is not only a quicker way to brown, but way less messy. Yes, you could just bake, but the broiler will take about half the time. By the way, as I mention in the video, if you have a few extra minutes, let the meatballs simmer on low to make the tomato sauceeven more flavorful.
Just because I’m showing you a few shortcuts, doesn’t mean you can’t add some longcuts back in. You can certainly use a more standard recipe, like our ricotta meatballs, and still use the no-roll and broiler methods to cut prep time, without sacrificing quality.
At the very least, I hope you try this recipe so you’ll have to go out a buy a couple portion scoops. Above and beyond expeditious meatball production, these “dishers” come in handy for so many other kitchen tasks. I hope you give them, and these easy meatballs a try soon. Enjoy!
Ingredients for about 48 little meatballs:
For the slurry:
1/2 cup plain breadcrumbs
1/4 cup milk
1 large egg
1/4 tsp red pepper flakes
2 tsp olive oil
1/2 tsp granulated garlic or garlic powder (not garlic salt)
A happiest of happy Mother's Day to all the moms, and mom-like followers of this blog. I've posted this clip before, but it never fails to make me chuckle, so here you go again. Have a wonderful day, and as always, enjoy!
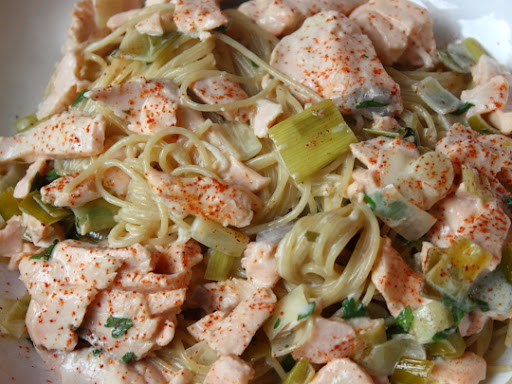
It feels like we’ve been swimming up river the last few days, as our small, but traumatic kitchen remodel takes place. I’m sure the project will come in well under budget, and way ahead of schedule, but for now, everything takes twice as long to do.
Happily, wanting to keep things simple is what spawned this very tasty salmon and leek pasta sauce. This recipe features two of my favorite foods; wild salmon and crème fraiche.
These types of seafood sauces are usually made with straight cream, or a béchamel, but I find those fall a little flat when compared to the tangy, fermented goodness of homemade sour cream. While it has the same fat content as cream, it just seems so much lighter and complex.
I’ll assume you’ve seen our winning “how to make your own crème fraiche” video, but if not, I highly suggest you do! Homemade crème fraiche will change your life. Check it out, and enjoy!
Finally, an appropriate use of the Plastic Wrap filter in Photoshop! Or maybe not. Anyway, we're on Day 1 of a little kitchen remolding project, so if I get a bit quiet on the blog over the next few days, that will be the very good reason. Regardless, the show must go on, and I should still have a brand new video for you sometime tomorrow. Wish us luck, and stay tuned!
There are so many food-related ways to show mom love this Mother’s Day weekend, but none will be more delicious than this creamy quiche Lorraine! What are your plans?
Breakfast in bed? Great idea, until you consider the crumbs and numb legs. Maybe brunch out? Sure, less clean up, but a mediocre meal at the local casual dining complex says, “we like you, mom,” more than it says, “we love you.”
That brings us to the best option; cooking brunch for mom at home. Of course you’ll need something that’s very easy to make, even ahead of time if need be, as well as supremely special and memorable. This cheesy, bacon and onion pie is all that, and more!
In this chef’s opinion, a proper quiche should be rich, custardy, and luxurious – not some kind of dense, baked omelet. This has only enough eggs and yolks to hold things together, but that means you need to let it cool to just warm before serving, to fully enjoy the experience.
I know many will ask, so I’ll cover it now… yes, of course you can just use milk instead of cream, and more whites instead of yolks to cut down on the calories, BUT you will not get the same amazing results, and since this is such a special occasion, you should give any substitutions careful consideration.
As you’ll see, this is very simple, so the challenge isn’t construction (by the way, the layering procedure wasn’t a joke…do it), the real trick it to not overcook the custard. I show you what it should look like, but in case you aren’t great at reading jiggles, use a thermometer, and pull at between 160-165 degrees F. internal temp.
Anyway, I’d like to wish my mother, and first culinary instructor, Pauline, a very happy Mother’s Day. Unfortunately we can’t be together Sunday, but I promise I’ll make quiche for her the next time I see her. I’d also like to wish my mother-in-law, Peggy, a happy Mother’s Day. She was the original Food Wishes fan (even before it was called “Food Wishes”), and was integral to the blog’s growth and success! Thanks, moms! Enjoy!
Ingredients: Pie dough for a large, single-crust, deep dish pie dish or pan (click here for recipe!)
8 slices bacon, cut into 1-inch pieces
1 cup (I used a little more) diced leeks (just white/light parts) and/or onions, washed extremely well! big pinch of salt
cayenne and freshly ground black pepper to taste
6 ounces shredded Gruyere cheese, divided (or other Swiss cheese)
For the custard:
3 large eggs, plus 2 additional egg yolks
1 cup cream
3/4 cup milk
1 tsp chopped fresh thyme leaves
Steps:
- Line inside crust with foil, fill halfway up with dried beans, rice, or baking weights
- ”Blind bake” the crust for 5 minutes at 425 degrees F.
- Remove foil/weights and bake another 5 minutes
- Reduce oven to 325 degrees F.
- Bake filled quiche for 40-45 minutes, or until set
Every once in a great while, I get a food wish from someone I admire and respect so much that I just can’t say no. This “Pad Thai” popcorn recipe was their latest request, and as always, I was more than thrilled to make this very influential person’s snack dream come true. Who is this mystery foodie? Me!
I was channel surfing late one night, and caught the very tail end of a show featuring a hot spot in Charleston, SC, called The Gin Joint. The theme was unique bar eats, and the host was talking about something called, “Pad Thai” popcorn. What was that?
I heard those words, and saw maybe five seconds of footage of what looked like caramel corn in a basket, and that was it. Frustrated, but quite excited, I jumped online to find the bar’s website, and hopefully the recipe. Nothing.
There were a few links with people talking about it, and a couple cell pictures, but no actual official recipe to be found. So, I decided to give myself a food wish – figure out how to recreate this extraordinary-sounding snack. I decided to simply fortify a standard caramel corn recipe with peanuts, lime, hot chilies, fish sauce, and cilantro.
Maybe it was beginner’s luck, or the collective consciousness of all the poor souls who’ve tasted that popcorn and desperately wished they could make it at home, but it came out incredibly well. Crispy, crunchy, sweet, spicy, aromatic, and awesome! You know I’m a fan of the hyperbole, but it’s with all sincerity that I say, this may be the greatest caramel popcorn-related snack breakthrough since balls.
By the way, since this was my first attempt, please feel free to adjust the ingredients amounts and report back. I think next time I’ll add a bit more lime and fish sauce, for a little extra kick. I may also explore using tamarind juice and/or palm sugar. Anyway, I hope you give this unbelievably addictive “Pad Thai” popcorn a try soon. Enjoy!
Ingredients for about 8 cups of Pad Thai Popcorn:
1/3 to 1/2 cup popping corn kernels (roughly 8 cups prepared popcorn)
1 cup finely chopped dry-roasted, salted peanuts
1/4 cup chopped cilantro
For the caramel sauce:
1/2 cup packed brown sugar
1/4 cup vegetable oil
1/4 cup corn syrup
2 or 3 tsp fresh lime juice
1 tbsp freshly grated lime zest
1 1/2 tbsp Asian fish sauce (fyi, if you don't use fish sauce, you'll have to add salt)
1 rounded tablespoon Sambal red chili sauce, or very finely diced fresh hot chilies
rounded 1/4 teaspoon baking soda (not baking powder) *bake 45 minutes at 250 degrees F., tossing 3 or 4 times during the cooking.
I’m not sure exactly when it’ll happen, but at some point this spring or summer, you’re going to start hating every one of your go-to grilled chicken recipes. Those recipes are delicious, but after decades of the same old, same old, you just get fatigued. Hopefully when that happens, you’ll remember this spicy, tarragon yogurt chicken recipe.
And you don’t even need to remember the specific ingredients. Except for the plain yogurt, the other components are completely adaptable. The endless varieties of vinegar/citrus options, fresh herbs, and hot sauces, means there’s an endless number of ways to personalize this recipe.
Imagine writing all your favorite herbs down on cards, and throwing them in a hat. Then, doing the same thing with your favorite vinegars and citrus juices, as well as hot sauces and salsas. When ready, close your eyes, and randomly picks cards to see what tasty version awaits you. It’s like a Mad Lib, only useful, and not stupid.
Here, let me try...[picks cards from old beaver skin hat]…okay, next time, along with the yogurt I’ll be using…[drum roll]…Sambal, lime juice, and basil…hey, that sounds awesome! See, it totally works.
As usual, I insist on you sharing any particularly amazing combinations you stumble upon. Anyway, I hope you give this super-easy, always juicy, and infinitely adjustable, grilled chicken recipe a try soon. Enjoy!
Marinade ingredients, enough for 4 large breasts:
1 bunch picked tarragon, leaves only
1/2 cup plain Greek yogurt
1/4 hot sauce or salsa (amounts will depend on spiciness, of course)
1 tbsp cumin
2 tsp kosher salt
2 peeled garlic cloves
2 tbsp vinegar or citrus juice
*Blend and marinade, chilled, for 2 to 3 hours before grilling.
Cinco de Mayo, or as I like to call it "Mexican St. Patrick’s Day," is almost here, and as everyone knows, the cornerstone of any great CDM celebration is the salsa cruda. It has to be homemade, and it has to be awesome. Actually, if you serve enough margaritas you could get away with store-bought, but for the sake of this post, let’s just go with it.
Salsa cruda simply means a raw sauce, and that’s really the only rule. This is also commonly called “pico de gallo,” which means “rooster's beak,” apparently because it was originally eaten by “pecking” or pinching small portions from the bowl with your thumb and forefinger. I’m going to ask that you please use a chip.
I’d say my formula is fairly standard, except for the cherry/grape tomatoes and the mint. Unless you’re blessed with a bounty of real, sweet, vine-ripened tomatoes, your best bet for a world class salsa is cherry tomatoes. While not a perfect substitute, they'll have the most similar flavor to the aforementioned summer treat. The mint brings a subtle, sweet twist and even more refreshing finish.
One word of warning: make twice as much as you think you are going to need…this stuff is seriously addictive. By the way, as I just informed my faithful followers on YouTube, I pronounce, “salsa,” “sal-za,” simply because I find it more festive. Enjoy!
Ingredients:
1 1/2 pound cherry or grape tomatoes, cut into a small dice